Saturday, 2 October 2021

October 2021 IPMS Ottawa On-Line SHOW & TELL

Welcome to IPMS Ottawa's ongoing monthly SHOW & TELL, which allows club members to show off their completed work despite not being able to attend group meetings. Each member is invited to send in up to three photos of a model and some explanation. October marks our fifteenth (15th) on-line show & tell. We thank all of our members and builders for keeping alive the hobby. All entries are always welcome.

The new & used model kit car boot sale and swap meet at Hobby Centre last Sunday was the first such sale in Ottawa for over a year and a half. Many Many IPMS Ottawa members were present both buying and selling. It was a great day and a great event. Thanks to Bill C. at Hobby Centre for hosting this in his parking lot.

THANK YOU TO ALL PARTICIPANTS, and KEEP BUILDING. 

! Miniature world domination !

Enjoy our show, and we all hope to meet again soon.


STRANGE MODEL OF THE MONTH

TUNA
This is a very odd plastic scale model of a tuna fish which was for sale in a sushi restaurant in Japan. The chunks of meat are removeable. The kit comes with a sword-like fish knife (below belly of model). At only 700 yen I really should have bought it.

plastic model of tuna and tuna steaks


FINISHED MODELS


1929 FORD MODEL A RACING CAR (AMT)
I built this model for a competition one of my online clubs had started. The theme involved vehicles that would compete in The Race of Gentlemen, which is vintage drag racing, held on a beach in New Jersey in October. Cars have to be pre-World War II, with no visible components later than 1953. The Body, engine, and chassis are from an AMT 1929 Ford roadster kit, with wheels from a Revell 1937 Ford pick-up. Exhaust is modified from the kit part, interior is detailed with various kit and aftermarket bits. I had planned to wire it, but ran out of time. I don't like the finish on the hubcaps, so I will be removing them and sanding down the sprue nibs, which I should have done during construction! (stupid deadlines...) Enjoy!

1929 Ford Model A racing car

1929 Ford Model A racing car

1929 Ford Model A racing car

1929 Ford Model A racing car

Fv-651 Salamander Mk 6 Crash Tender (ACE 1:72)
Nicely detailed emergency vehicle, Built SOB.
FV-651/652 Salamander is a 6X6 Airport Crash Tender with off-road capabilities, developed in 1956. It shares the same common Alvis six-wheel-drive chassis and other components with the FV 601 Saladin AC and FV 603 Saracen APC. Fire fighting equipment was provided by The Pyrene Company Limited. They could produce 7,500 gallons of foam per minute and carried a crew of 6. 125 Salamanders were built and used in the Royal Air Force and Royal Canadian Air Force.
Michael Roy

Fv-651 Salamander Mk 6 Crash Tender

1958 Alvis Mk 6A crash tender


NIEUPORT 17 XVII C.1 in RUSSIAN SERVICE (Eduard 1:48)
The Imperial Russian Air Service Nieuport 17 XVII C.1 s/n 4187 flown with the 22 KAO  (air detachment organic to an army corps) in September 1917 just before theRussian Revolution. 
Never has a kit caused me this much agony. Near the end of the build I crushed the model while holding pressure on the wings to allow the CA glue to set on the struts. This was also my first attempt at rigging, but only the tail section is rigged. Decals sit nicely on a coat of Future floor wax. There are about 25 photo etch parts in the build; almost all of them tiny and easy to lose. The masks provided were of very poor quality. Basic colour is Vallejo acrylic aged white.

Nieuport 17 XVII C.1 s/n 4187
MiG-3 Микоян и Гуревич МиГ-3  (Classic Airframes 1:48)
This is the MiG-3 Микоян и Гуревич МиГ-3 presented as flying with the 12 Guards IAP of the Moscow Air Defence (PVO) in March 1942, and bearing the title За Партию Большевиков "For the Party of the Bolsheviks".
The kit comes with resin cockpit and a small panel of PE parts, There are far too many PE parts, and all are small or tiny. The cockpit alone has some 13 PE parts. Each landing gear has four PE parts. The canopy is a single vacuform part which I cut in three so it could be left open to show off the disaster I created in the cockpit. I also added a screen grill in the underside air intake, and put in a metal pitot tube and strung stretched sprue as radio wire. Paint for the body is mosly Tamiya, while most other colours are Vallejo. I bought this as a used kit from Bill at Hobby Centre in Ottawa. It was a stalled Covid-19 project which all of a sudden looked attractive.

MiG-3 Микоян и Гуревич МиГ-3
MiG-3 МиГ-3
MiG-3 МиГ-3
T-55 MAIN BATTLE TANK (Trumpeter 1:35)
This is a T-55 main battle tank in Soviet Army service as built in the mid-production years by the Kharkiv Locomotive Factory (ХПЗ KhPZ), This was arguably the finest and most durable tank to emerge from WWII/Great Patriotic War. Several western tanks and anti-tank weapons were designed specifically to combat the T-54/T-55. Thousands of these tanks remain in service around the world.
The model is a Trumpeter kit of an Israeli army Tiran Ti-67 tank (#MM00339) which was a rebuild of the T-54/T-55 tanks captured from the Egyptian army and re-engineered for desert warfare. I removed all the upgrades and Israeli features to return the model to the way the T-55 would have looked in about 1966 when it formed the bulk of the Soviet Army armoured forces. The tank is named Kолхозник (Kolkhozhnik), or Collective Farm Worker, and this name appears on the rear of the turret.
Paint is all Vallejo greens, washes and powders. Decals, brief as they are, are from another armoured vehicle. The only problem with the kit was that the rubber tracks were badly warped and bent, and nothing I did fixed the kinks. In the end I positioned the tracks in such as way as to be able to glue the worst kink to the road wheel and hide the bend. I had to cut off the large infra-red covered lamp and reposition it to match the angle of the main gun. I added a wooden log on the rear plate, and a wound metal wire tow cable on the bow plate.
T-55 main battle tank

T-55 main battle tank


WORKS in PROGRESS


Skoda M1916 305mm seige howitzer (Tacom 1:35)
This is a WIP as there is not yet a base with a ramp for bringing up the 400 kg shells on a dolly. These were used by the Austro-Hungarian empire's armies against the Imperial Russian Armies. Thanks go out to Glenn for this great kit from the swap meet.


JASON GIRL
Meet Jason Girl, an anime-stylized, female-parody figure model of the serial killer from the slasher film series Friday the 13th.  The first picture is taken from the GK Models website and shows what Jason Girl should look like when completed. As is typical with GK Models kits, there are no instructions, just several photos of the completed figure. Luckily, the kit consists of only 33 resin parts, including the base and fit together very intuitively and fit very well. I started the kit in June as part of a Halloween Group Build on the Hobby Link International forums. While I started in June, I was distracted with other projects and only got back to serious work in September.

The first thing with resin kits is the clean-up. The clean up process was fill & sand, prime, inspect, repeat…repeat and repeat. Once I was happy with the parts clean up I assemble the main figure and the coat. I then repeated and repeated and repeated, etc the clean-up process …I think I went about 3-4 rounds before I was happy with the overall figure. My primary goal was to make sure the skin areas were smooth and showing no blemishes after priming. One of the most troublesome spots were the collar bones and between the breasts where resin had pooled, likely due to air bubbles in the molds.  This is where the AK Fibreglass Sander comes in handy. Note that I wasn’t as concerned with the clothing; in this scale the clothing texture would be visible and in ragged condition, well at least the coat. Given the fashion trends these days, the pants may have been manufactured with all the rips.

Once I was happy, I tacked on the jacket, shirt, and hair. Then I placed the figure under a light to see where the shadows fell and took photos for later reference. I then began to add some colour. I reprimed the skin areas with Mr Surfacer 1500 White. Then shooting upwards from the feet and working up towards the head, I sprayed the flesh areas with Mr Color Coral Pink. I also sprayed the areas that are in shadow, like under the back of the coat and hair, with the Coral Pink. Then shooting downwards from the head and working towards the feet, I sprayed with Mr Color Milky Peach onto the flesh areas. I also dusted the Coral Pink with the Milky Peach as well.  After these layers had cured, I mixed a bit the Coral Pink into the Milky Peach and with low pressure and a 0.18 mm needle I sprayed the shadow areas; I repeated this with the highlight area but with Mr Color White added to the Milky Peach. This added more definition to the shadows and highlights. Note so far, I have only used the airbrush. The next steps will be to bring out the face and add more definition to the abs and neck, but this will be brush work. You’ll not some chipping on the face, I attempted to add a bit of colour to the cheeks, but I hadn’t cleaned the brush properly and it became grey blotches in stead of rosy cheeks. I wiped the paint off, but it also messed up the face. I will need to sand, reprime, and repaint the cheeks and nose before proceeding.

While I was waiting on the flesh colours to cure, I started on the shirt and jacket. The shirt is Mr Color Bright Blue lightened with Mr Color Light Grey (FS36495). I’ve sprayed highlights created by adding white to the blue colour.  I still need to work in the shadows.  For the jacket, I did an overall coat of AK Real Color Dark Tan.  I then added AK RC NATO Brown to the Dark Tan and sprayed the deep shadows. Adding more Dark Tan to the mixture, which I sprayed to the lesser shadows. Given the way the jacket billows away from the figure, I sprayed the darker colour on the upper portions of the underside, moving to lighter shadows towards the underside edges. With the outside, back of the jacket I sprayed the darker shade closer to the middle of the curl in the jacket and the lighter along the shoulders and the bottom of the jacket.  I still need to work in the highlights on the jacket.

Given the earthy and darker tones in this piece, I want to add bit of colour. The shirt was one area. Another area I decided was the tips of Jason Girl’s hair. After spraying the hair pieces with a mixture of Model Master (yes, I have a few bottles lying around) Raw Umber and Raw Sienna, I then thinned down for airbrushing some Violet artist oil paint and sprayed the tips of the hair pieces. I want to deepen the purple a bit more. Once I am finished with the face details, I will fit the hair pieces in place and then work up the hair with washes and dry brushing to bring out the details.

In the pictures of my build up, the shirt, jacket and hair are only temporarily fitted.

I really hope I finish this before Halloween but given that this is the first large scale figure I’ve attempted, I am not going to rush it...even if I don’t finish by the deadline. 
Bill Eggleton

Jason Girl

Jason Girl

Jason Girl

Jason Girl

CANADIAN ARMY LEOPARD 2A6 MAIN BATTLE TANK (Dragon 1:72)
Painted but not assembled. It is being sent to a friend who cannot paint but who wants to build a Leopard tank. So I spray-painted the sprue and parts for him using Tamiya Field Grey acrylic.


Wednesday, 1 September 2021

September 2021 IPMS Ottawa On-Line SHOW & TELL

Welcome to IPMS Ottawa's ongoing monthly SHOW & TELL, which allows club members to show off their completed work despite not being able to attend group meetings. Each member is invited to send in up to three photos of a model and some explanation. September marks our fourteenth (14th) on-line show & tell. We thank all of our members and builders for keeping alive the hobby. The theme this month, as in each September, is ANYTHING BRITISH. However, all entries are always welcome.

Please note there will be a new & used model kit car boot sale and swap meet at Hobby Centre on Sunday 26 September 2021 at 09:00. This is the first such sale in Ottawa for over a year and a half.

THANK YOU TO ALL PARTICIPANTS, and KEEP BUILDING. 

! Miniature world domination !

Enjoy our show, and we all hope to meet again soon.


HELLCAT Mk.I/Mk.II (Eduard 1:48)
The model represents a Hellcat Mk I from FAA Squadron 800 flying off HMS EMPEROR in June 1944 where they provided air support to the Normandy Invasion. I started both the Hellcat Mk I and Mk II kits in September 2016 during one of IPMS Ottawa’s Build days at the Canadian Aviation and Space Museum. I eventually finished the Mk II for HeritageCon in 2018; however, the Mk I was on and off the Shelf of Doom since 2016. In June of this, I got inspired to finish a few of the Shelf Queens, including this Hellcat. When I had last worked on it, I had applied the decals, sprayed a gloss coat, and started on panel lining. I had finished the panel lining on the bottom and had applied Tamiya panel liner to the top, but I did not clean it up until I pulled it off the shelf this year. Cotton swabs dampened with mineral spirits worked wonders on cleaning up the excess, dried/cured panel liner. Once that was done, I proceeded to spray a matt finish using AK 3 Gen Matt Varnish for the first time. This was a mistake. The AK Matt Varnish does not seem to take well to weathering with oils, or pencils for that matter. I noticed bits of the varnish peeling off in areas, the worst was when I pulled the masking of the windscreen and pulled the varnish off along the upper cowl. With the varnish peeling, it also took away the weathering in those areas. Wiping the edges with a swab dampened in Windex. This seemed to removed the lifting varnish without further peeling. I then sprayed these areas with Tamiya Flat Clear and reapplied the weathering. While I enjoyed and was satisfied with the overall build, I am not completely happy with the finish due to the chipping/peeling flat coat as I was unable to fix all areas.  
The first two pictures are of the left and right side, the third shows off the bottom and the last picture is the two models together. The Hellcat Mk II is a FAA Squadron 1844 NFD was the aircraft flown by Lt Bill Atkinson, RCNVR.
Bill Eggleton
Hellcat Mk I

Hellcat Mk I

Hellcat Mk I

Hellcat Mk I & Mk II

 Lt Bill Atkinson, RCNVR

de Havilland Canada DHC-1 Chipmunk (AZmodel 7557 1:72)
I bought an AZmodel Chipmunk kit, intending to build it in Canadian markings – then realized that it only had the flat-sided canopy of the UK machines, and no bubble canopy as used by Canadian aircraft (lesson learned: do the research first, then buy the kit/decals).   Then along came the latest issue of RT, showing that I could build this kit in Canadian markings after all.  So I did.
I added a few details – instrument panel sun shades, rotating propeller, engine exhaust, pitot tube, brakes, landing light, and wingtip lights.  The most difficult task was getting a pilot figure into the cockpit – major surgery was required and the sides of the canopy had to be significantly thinned.
Paints are a combination of Testors/Model Master enamels, Tamiya and Mr Hobby acrylics, and AK Extreme Metal polished aluminum.  I used the lovely IPMS Canada decals from issue 43-2.
Peter de Salis
DHC-1 Chipmunk

DHC-1 Chipmunk

DHC-1 Chipmunk


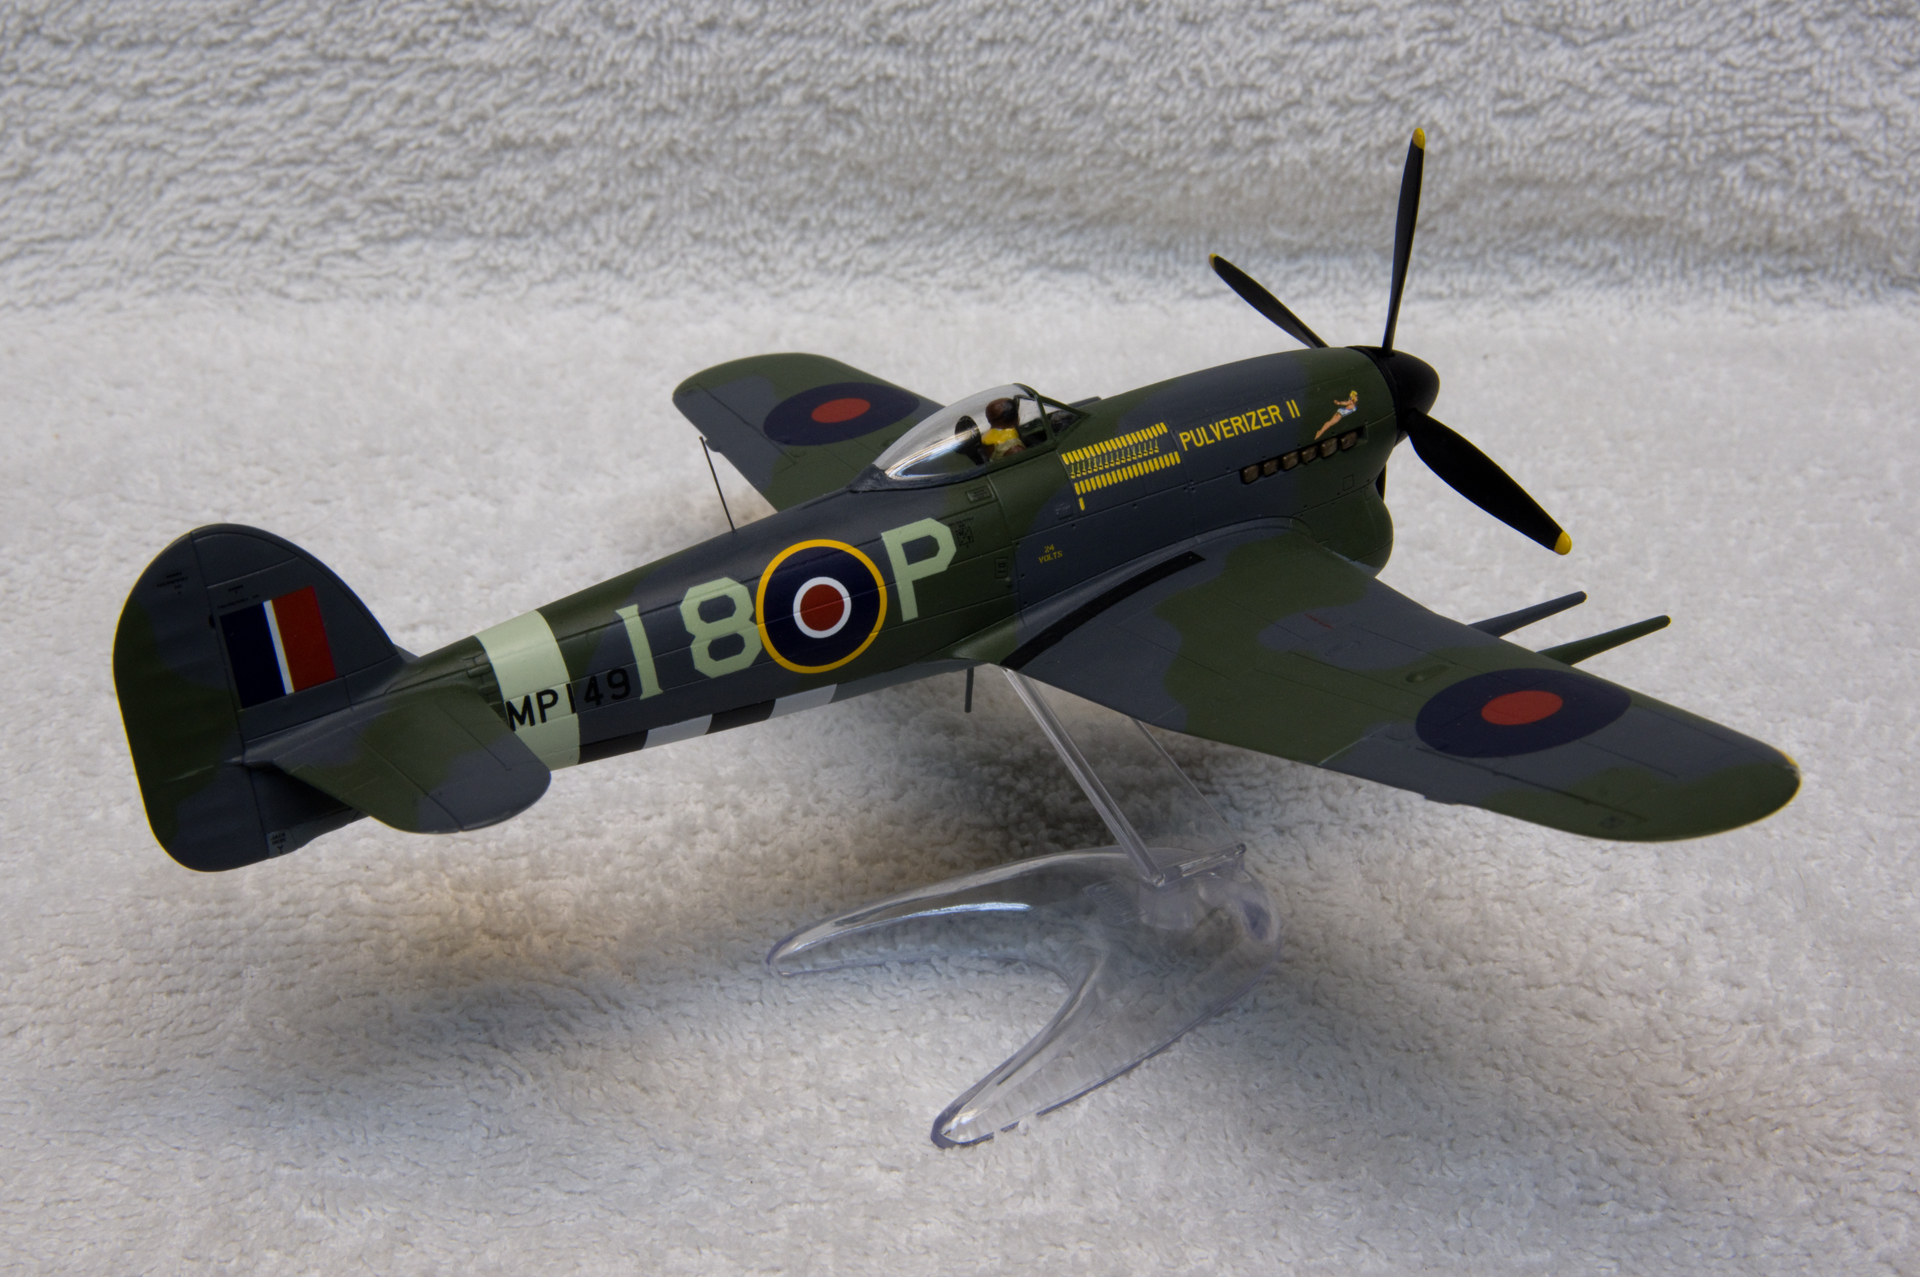
Hawker Typhoon Mk 1B (Airfix 1:72)
I made a quintet of WW2 fighters in Canadian markings (as close as you can with such things, given the RAF was running the show).  My favourite was the Mk 1B Typhoon – I made it as I8*P of RCAF 440 Sqn, at B.78 Eindhoven in late 1944.  The tricky part for me was making a paper mask for the camouflage, which I stuck on slightly loosely by making holes in the pattern and putting tape over the holes.
Maybe someday I'll add some weathering.
Paints are Testors/Model Master enamels.  The decals that were specific to this machine are from Aviaeology, and the generic ones (stripes, stencils) were from the kit.
Peter de Salis
Typhoon Mk 1B

Typhoon Mk 1B

Typhoon Mk 1B


HMS VICTORY (1:200)
This HMS VICTORY model project which took over three years to complete because I did nothing to it for most of those three years. It is a wooden kit from an unnamed company in China. The finish took one week, but it sat untouched for about three years time.
This is a cross-section of the famous sailing battleship commanded by Admiral Nelson and victorious at the battle of Trafalgar in 1805. It is preserved as a national treasure at the Royal Navy Yard in Portsmouth. I first visited the ship in 1977.
What made the build so very difficult is that the box mailed from China did not have the instruction sheets in it. So everything is a series of guesses based on photos of the real thing and of professional models of the Victory. It is an all-wood kit. Only the gun barrels are brass. The kit costs about $30. There are several parts remaining and without plans I have no idea what they might be used for! Most of the paint is Vallejo, with some yellow from Tamiya. Not plastic, but at least British.

HMS Victory

HMS Victory

HMS Victory


RMS MAURETANIA (Airfix 1:600)
Cunard had Swan Hunter build this record-breaking ocean liner in 1906 as a twin with RMS Lusitania. Unlike the second ship, the RMS Mauretania (named after the Roman province of North-West Africa) served for 27 years, and held the Blue Riband speed record on the North Atlantic for 20 years with a speed of nearly 50 km/hr. It was the first ocean liner to utilize steam turbines instead of pistons to carry over 2160 passengers across the Atlantic in five days. It was the largest ship in the world until 1910.
This is the very old (1964) and very rough Airfix kit, and was part of a series of kits of British ocean liners. The whole build was an exercise in nostalgia, as I attempted to imagine myself as a small boy who received a paper-wrapped kit in about 1966 and proceeded to glue it all together and paint it from little pots of British Humbrol paints. It all went together in a week and was very much the fun model build of a child. Smoke is cotton wool with Vallejo soot powder.

RMS Mauretania

RMS Mauretania

RMS Mauretania


DUKW 353 (Italeri 1:72, with PE update set and 3-D printed stretchers)
The kit was actually completed a few years ago as a military vehicle but then I came a cross a rare photo of it being used in Normandy to transfer wounded from beach to ship.  I made the white/red cross insignia panel and built the stretcher supports. This one is now part of my Ambulance collection.
Michael Roy
DUKW 353


LAUZ 967 Soviet Modern Light Amphibious Vehicle (ARMORY 1:72)
A 4 wheel drive "transporter" that can carry 400kg and go over various terrain. Produced 1961-75.  Used by Soviet Army Airborne Troops (VDV) for casualty evacuation.
Michael Roy
LAUZ 967


50th ANNIVERSARY of CUP NOODLE (BanDai 1:1)
This is the very unusual 1:1 scale plastic model from BanDai of the (in)famous CUP NOODLE original release from Nissin of Japan in celebration of the 50th anniversary of the premiere of the product on 18 September 1971.
The model was released in celebration of the upcoming 50th anniversary of Cup Noodle. If you happen to be in Yokohama Japan feel free to visit the Cup Noodle Museum for the full unadulterated cup noodle experience, and to buy cup noodle merchandise if that is what you need. Instant ramen noodles were invented by Momofuku Ando in 1958, and the three-minute Cup Noodles  premiered on 18 September 1971. Sales of Cup Noodles begin at Isetan Department Store in Tokyo's Shinjuku district. 
The kit is without doubt some of the best engineering of plastic model parts I have ever seen. Several of the ring parts are moulded with the sprue on the inside of the ring so that removal does not leave any visible signs on the outside of the parts. Amazing! The whole thing is a snap-together model, and the tolerances and fit are superb. Who needs stinky glue?
The most amazing aspect of the kit is the plastic wrap stickers for the shrimp parts. The shrimp are moulded in an orange plastic which does not look much like cooked shrimp. The plastic sticker fits almost perfectly on a bumpy compound curved surface and instantly gives the proper colour for shrimp. It is hard to believe just how well thought out is this kit. The food parts are astoundingly life like, if you consider instant ramen to be food.
John Clearwater
Cup Noodle

Cup Noodle

Cup Noodle, both real and imagined,
with the model looking far tastier than the real one.

WORKS-IN-PROGRESS...


SA3 Конденсатор Kondensator (OKB Grigorov 1:72)
big ass gun!!
The 2A3 Kondensator 2P (2А3 Конденсатор - Capacitor) was a Soviet 406 mm self-propelled howitzer capable of firing nuclear projectiles. 2A3 is its GRAU designation. It was in service from 1956 until 1960.
This is a tracked gun, essentially a battleship gun on a tracked chassis! Only 4 were built - why - well, they were slow, couldn't go under most bridges, probably couldn't go over a lot more, no trucks or trains for transport and they found things broke when fired. After firing; the vehicle had to be checked and usually they found the idlers broken or the tranny messed up - they rolled back a piece when fired. So a 64 ton gun with a 16 miles range.
The kit is resin, etch and turned metal (barrel) with an amazing fit. Produced by OKB Grigorov it is being built for a BIG gun build on a discussion group.
The figure in the one pic is a 1:72 scale man about 1.75m tall. You can then see how small some of the etch pieces are! In the first picture the big chunk of resin is the breech!
Graham M.
2А3 Конденсатор carrriage and breech.

2А3 Конденсатор ultra tiny PE part

2А3 Конденсатор carriage

2А3 Конденсатор in Moscow's Central Armed Forces Museum

Leningrad's Artillery Museum display of very heavy artillery

F-4 Phantom II (Tamiya 1:48)
I have never built an F-4 Phantom II model kit in my adult life; same with a Spitfire. (There, I admitted it... don't judge me! LOL) Even with all the offerings over the years from Revell/Monogram, Hasegawa,
Fujimi, Academy, and more recently Zoukei-Mura, I never got around to building an F-4. Then along comes Tamiya with their newest 1/48 F-4B offering, and the accolades keep pouring in left and right. I was curious to find out if this kit was as good as everyone is saying. It took only a few assembly steps to realized that the praise is well deserved. The engineering is ingenious, and the detail, fit, and finish are superb. I am now quite ruined for building F-4 kits from other manufacturers; Tamiya is now the 'gold standard.' I do not plan to use the kit decals, as I do not want to have the same model sitting on a contest table like so many others; on a recommendation from club member Peter Steacy, I went with decals from Bullseye Aviation Decals along with a different tail fin cap from Flying Leathernecks. I plan to build my F-4 with wings folded, flaperons sagged, speedbrakes extended, and canopies open. Other than a different fin cap and metal pitot tubes, this will be an out-of-box build. Highly recommended for
F-4 aficionados. Full build: https://photos.app.goo.gl/A7CFq1HnKsMjB8F16
Glenn Cauley
F-4 Phantom II cockpit model, with decal on instrument panel

F-4 Phantom II forward landing gear bay


F-4 Phantom II blast end

And this is where they end up... in a military museum in Viet Nam