Welcome to IPMS Ottawa's ongoing monthly SHOW & TELL, which allows club members to show off their completed work despite not being able to attend group meetings. Each member is invited to send in up to four photos of a model and some explanation. February marks our nineteenth (19th) on-line show & tell. We thank all of our members and builders for keeping alive the hobby. All entries are always welcome.
THANK YOU TO ALL PARTICIPANTS, and KEEP BUILDING.
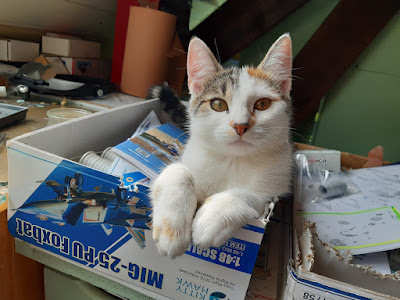
! Miniature world domination !
Enjoy our show, and we all hope to meet again soon.
NEW BEGINNINGS
This blog is happy to note that our late friend from IPMS France, Tomy the Technical Advisor has been replaced by Vera, who is also very interested in our favourite hobby.
FINISHED MODELS
Volkswagen 1200 "Beetle" (Airfix 1:32)
For my latest completion, I built an Airfix 1:32 Volkswagen 1200 "Beetle". This kit was built OOB, and finished using Tamiya paints and Alclad for the larger chrome pieces. For a model originally tooled in the early 1960's, it does have some challenges with fit and finish, but it does build into a nice display model.
Ken Nesbitt


Hunter (Privateer Press, 30mm scale)
This is a 2004 pewter model of a Hunter warjack -- a six tonne steam-powered robot -- from Privateer Press. Primed with Badger Stynylrez, then painted with various acrylics, mostly Reaper and P3.
The blue-grey was airbrushed, the rest was hand-painted.
Vallejo Metal Color was used for the silver metals. For the gold metallics, I'm making my own paint by mixing Green Stuff World metallic pigments with Vallejo Metal Color metal varnish. Both of these paints work nicely with artist acrylic inks for shading, adding the blue tone to the reflections in the metal, etc.
The one picture has a nickel for scale.
Brian Latour


Bristol Beaufighter TF Mk X (Airfix 1:72)
My first completed model of 2022 is a Bristol Beaufighter TF Mk X in the markings of NE686 EO*T from RCAF 404 Sqn at RAF Dallachy, Moray Scotland in early 1945.
I used the recent Airfix kit which is quite good. The kit included extra parts that are useful for other variants – I used the shorter engine intakes. The decals were also very good, with a full set of airframe stencils (although one has a spelling error which you can see with a magnifier). I added a bit of detail to the engines, lights, and antennas.
The main paint is AK Real Colours, which airbrushes well. I had a problem with the pilot – his feet were too far apart to fit into the rudder pedals, so I had to do some surgery on his legs.
Peter de Salis


SeaRAM CIWS Weapon Loading
At long last we can put my SeaRAM diorama in the "FINISHED" section! It only took 8 months...
“BREAK TIME” 1/35
With the completion of the figures, I am calling this diorama done. It was a fantastic journey which saw me trying new things, but more importantly it made me confront and overcome my long-held fear of making figures. Thank you to everyone who supported me in that! The last month was a flurry of activity to build natural-looking figures to tell a simple story: a technician taking a break and having a drink, while supervisors on the deck consulted their notes. (Those who look closer will notice that Marco the Tech is getting the stink eye from one of the supervisors, likely for being untethered and not wearing his hardhat). Building the figure of the tech was rather complex, as I had to cobble together mismatched parts from different figures in a set (and perform some major surgery), and then I researched, designed, and fabricated a full safety harness and tether system. I also found the time to add small details along the way, including a scratchbuilt ratchet set and case, handheld spanner, and more. When posting pictures of some of the finer details, it became an exercise in “Where’s the Dime?” which I often use for scale reference. I am now planning on building figures for some of my other “dioramas-without-figures” to better tell a story about the central model, and am even thinking about trying artists inks to paint them. Who’d’a thunk it, right?!?
Glenn Cauley


ZiL D-470 'Moose" USSR Airfield/Aerodrome Rotary Snowblower (AVD 1:43)
ЗиЛ Завод имени Лихачева Д-470/ Д-204. Шнекороторный снегоочиститель на базе ЗИЛ-157. The Soviets informally called this snowblower the Лось 'Moose'.
The ZiL D-470 was based on the ZiL-157 chassis and made into an airfield snowblower in 1958. With both engines running it could go nearly 80 km/hr flat out, and had a mass of some 8.8 tonnes over a length of 8 m. It remained in production until 1986 at the Sewdormasch factory in Severodvinsk. A thousand were built in the first eight years alone. Later versions had their main truck gasoline engine removed and simply took all tractive power from the large tank engine in the rear housing. The final production version could clear up to 720 tonnes of snow per hour.
My wife very kindly bought the 1958 ZiL D-470 airfield rotary snowblower as my christmas present. It arrived from St Peterburg Russia just in time. The only parts which were not up to general standard of the box were the two massive rotary blades which needed a lot of body work to get rid of the seams. Base plastic is black, so everyhing is spray painted using body gloss orange and the snowblower matte red (Tamiya acrylics), along with blacks and greys and interior green. The forward cabin itself is cast metal, so is primed with Tamiya white metal primer. The decals look okay, and stick down nicely, but I was shocked to find out that all the decal images are printed on a single sheet of clear, so each has to be labouriously cut out and trimmed. There are no decal placement drawings.
It is marked as a Soviet airfield/airport snowblower from about 1966. Imagine fleets of these moving through the darkness of a Soviet winter clearing runways and roads.
This Russian kit has much to recommend it (it is very unique and looks large); and much to hate (poor slightly soft plastic, useless instructions, and a single uncut sheet with all decals printed on). But it has been a wonderful and fun build of something we Canadians can really appreciate - moving vast quantities of snow in short periods.
The build was fun but a bit of a nightmare as the kit instructions are about as bad as can be. At least it has a lot of metal pins for securing the blower rig to the chassis.
John Clearwater


WORKS IN PROGRESS
Mack Bulldog Tank Truck (Monogram 1:24)
I am building the Mack Bulldog Tank Truck as my entry to the Monogram/Revell Group Build at Model Makers’ Union FaceBook page. Although the Tank Truck version was first released in 1974, the kit can be traced back to the 1967 release of the Monogram Tom Daniel’s Beer Wagon, a customized, hot rod version of the Mack AC truck. The Mack AC has also been released as a stake truck in 1973, a dump truck and log truck, both in 1976. All five versions have been re-released several times; this particular kit is the 2009 boxing of the Tank Truck.
The Mack AC truck–said to be “the truck that build America”–achieved a degree of success and international fame which has never been approached by any other truck in history. After the eminently successful introduction of the medium-duty Mack AB truck series in 1914, the AC series began production in 1915/16 and was manufactured continuously for 24 years until 1939–the longest production run of any American automotive vehicle. Serving both American and British troops in Europe during WWI, the AC distinguished itself with incredible toughness and dependability. With their snub-nosed hoods, the Mack AC trucks resembled Bulldogs in both appearance and performance, and hence became known as the ‘Bulldog Macks.’ This appellation grew to encompass all Mack products, and the company adopted it as its corporate symbol in 1922. The famous Bulldog hood ornament began to appear in the early thirties.
The Mack AC is powered by an in-line 471 cubic inch 4-cylinder 40 HP 1,175 RPM which drives a dual chain-driven rear axle via a four-speed transmission. Unlike modern vehicles, the transmission is separated from the engine by the drive shaft, being connected to the differential. Also unique is the behind the engine radiator and centrifugal fan.
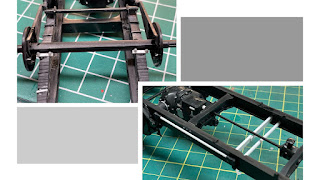
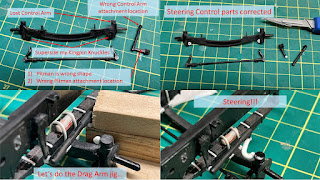
Assembly begins with the springs. Half of each leaf spring is moulded to the c-channel longitudinal frame pieces with the other half moulded as a separate piece. This was where the age of the kit began to show. A lot of the flat surfaces had a slight angle to them. This included the frame pieces, the leaf springs, the axles, etc. I believe this is an artifact of the mold technology of the time. The clean up of the leaf springs was a very slow and tedious process. I began working on the transmission/differential unit by removing all blobs that I believe were to represent nuts and bolts as well as much of the erroneous details. I began replacing the blobs with Meng nuts and bolts. I also cut the axles off the differential to flatten the surrounding surface for the Meng nuts. It also permitted the frame to be assembled without the transmission, making it easy to ensure squareness of the frame. I left off one axle to allow fitting of the transmission/differential unit into the appropriate spot; the axle was also added during installation of transmission unit. Once the transmission was installed, I moved onto the axles. The rear axle required little modification, but the steering components of the front axle needed some work, primarily replacing the missing control arm.
I am moving on to modifying and assembling the engine as well as the cab of the truck. The group build ends at the end of March, so wish me luck in finishing…
Bill