Welcome to IPMS Ottawa's ongoing monthly SHOW & TELL, which allows club members to show off their completed work despite not being able to attend group meetings. Each member is invited to send in up to three photos of a model and some explanation. September marks our fourteenth (14th) on-line show & tell. We thank all of our members and builders for keeping alive the hobby. The theme this month, as in each September, is ANYTHING BRITISH. However, all entries are always welcome.
Please note there will be a new & used model kit car boot sale and swap meet at Hobby Centre on Sunday 26 September 2021 at 09:00. This is the first such sale in Ottawa for over a year and a half.
THANK YOU TO ALL PARTICIPANTS, and KEEP BUILDING.
! Miniature world domination !
Enjoy our show, and we all hope to meet again soon.
HELLCAT Mk.I/Mk.II (Eduard 1:48)
The model represents a Hellcat Mk I from FAA Squadron 800 flying off HMS EMPEROR in June 1944 where they provided air support to the Normandy Invasion. I started both the Hellcat Mk I and Mk II kits in September 2016 during one of IPMS Ottawa’s Build days at the Canadian Aviation and Space Museum. I eventually finished the Mk II for HeritageCon in 2018; however, the Mk I was on and off the Shelf of Doom since 2016. In June of this, I got inspired to finish a few of the Shelf Queens, including this Hellcat. When I had last worked on it, I had applied the decals, sprayed a gloss coat, and started on panel lining. I had finished the panel lining on the bottom and had applied Tamiya panel liner to the top, but I did not clean it up until I pulled it off the shelf this year. Cotton swabs dampened with mineral spirits worked wonders on cleaning up the excess, dried/cured panel liner. Once that was done, I proceeded to spray a matt finish using AK 3 Gen Matt Varnish for the first time. This was a mistake. The AK Matt Varnish does not seem to take well to weathering with oils, or pencils for that matter. I noticed bits of the varnish peeling off in areas, the worst was when I pulled the masking of the windscreen and pulled the varnish off along the upper cowl. With the varnish peeling, it also took away the weathering in those areas. Wiping the edges with a swab dampened in Windex. This seemed to removed the lifting varnish without further peeling. I then sprayed these areas with Tamiya Flat Clear and reapplied the weathering. While I enjoyed and was satisfied with the overall build, I am not completely happy with the finish due to the chipping/peeling flat coat as I was unable to fix all areas.
The first two pictures are of the left and right side, the third shows off the bottom and the last picture is the two models together. The Hellcat Mk II is a FAA Squadron 1844 NFD was the aircraft flown by Lt Bill Atkinson, RCNVR.
Bill Eggleton
 |
| Hellcat Mk I |
 |
| Hellcat Mk I |
 |
| Hellcat Mk I |
 |
| Hellcat Mk I & Mk II |
 |
| Lt Bill Atkinson, RCNVR |
de Havilland Canada DHC-1 Chipmunk (AZmodel 7557 1:72)
I bought an AZmodel Chipmunk kit, intending to build it in Canadian markings – then realized that it only had the flat-sided canopy of the UK machines, and no bubble canopy as used by Canadian aircraft (lesson learned: do the research first, then buy the kit/decals). Then along came the latest issue of RT, showing that I could build this kit in Canadian markings after all. So I did.
I added a few details – instrument panel sun shades, rotating propeller, engine exhaust, pitot tube, brakes, landing light, and wingtip lights. The most difficult task was getting a pilot figure into the cockpit – major surgery was required and the sides of the canopy had to be significantly thinned.
Paints are a combination of Testors/Model Master enamels, Tamiya and Mr Hobby acrylics, and AK Extreme Metal polished aluminum. I used the lovely IPMS Canada decals from issue 43-2.
Peter de Salis
 |
| DHC-1 Chipmunk |
 |
| DHC-1 Chipmunk |
 |
| DHC-1 Chipmunk |

Hawker Typhoon Mk 1B (Airfix 1:72)
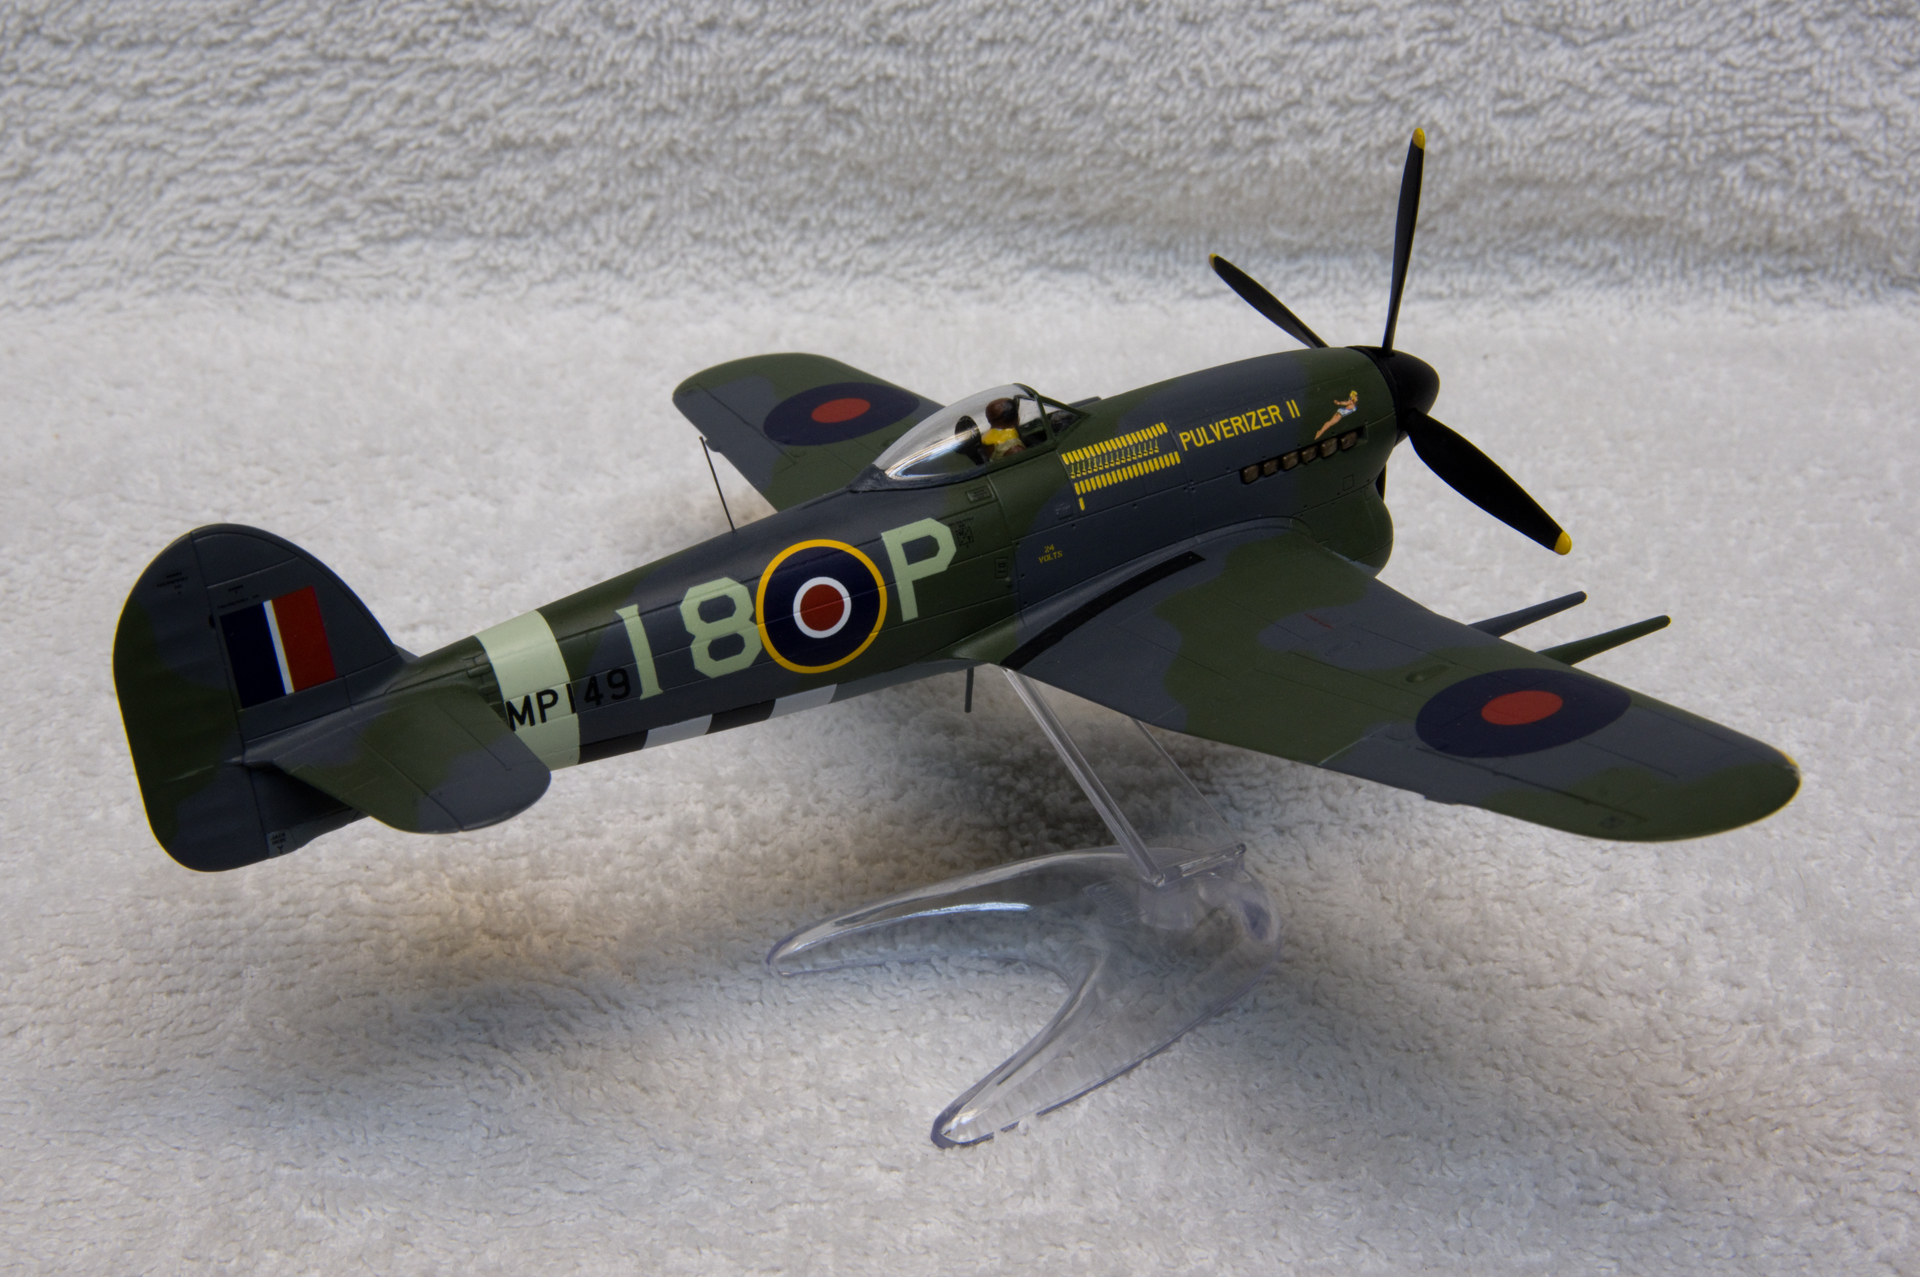
I made a quintet of WW2 fighters in Canadian markings (as close as you can with such things, given the RAF was running the show). My favourite was the Mk 1B Typhoon – I made it as I8*P of RCAF 440 Sqn, at B.78 Eindhoven in late 1944. The tricky part for me was making a paper mask for the camouflage, which I stuck on slightly loosely by making holes in the pattern and putting tape over the holes.
Maybe someday I'll add some weathering.
Paints are Testors/Model Master enamels. The decals that were specific to this machine are from Aviaeology, and the generic ones (stripes, stencils) were from the kit.
Peter de Salis
 |
| Typhoon Mk 1B |
 |
| Typhoon Mk 1B |
 |
| Typhoon Mk 1B |

HMS VICTORY (1:200)
This HMS VICTORY model project which took over three years to complete because I did nothing to it for most of those three years. It is a wooden kit from an unnamed company in China. The finish took one week, but it sat untouched for about three years time.
This is a cross-section of the famous sailing battleship commanded by Admiral Nelson and victorious at the battle of Trafalgar in 1805. It is preserved as a national treasure at the Royal Navy Yard in Portsmouth. I first visited the ship in 1977.
What made the build so very difficult is that the box mailed from China did not have the instruction sheets in it. So everything is a series of guesses based on photos of the real thing and of professional models of the Victory. It is an all-wood kit. Only the gun barrels are brass. The kit costs about $30. There are several parts remaining and without plans I have no idea what they might be used for! Most of the paint is Vallejo, with some yellow from Tamiya. Not plastic, but at least British.
 |
| HMS Victory |
 |
| HMS Victory |
 |
| HMS Victory |

RMS MAURETANIA (Airfix 1:600)
Cunard had Swan Hunter build this record-breaking ocean liner in 1906 as a twin with RMS Lusitania. Unlike the second ship, the RMS Mauretania (named after the Roman province of North-West Africa) served for 27 years, and held the Blue Riband speed record on the North Atlantic for 20 years with a speed of nearly 50 km/hr. It was the first ocean liner to utilize steam turbines instead of pistons to carry over 2160 passengers across the Atlantic in five days. It was the largest ship in the world until 1910.
This is the very old (1964) and very rough Airfix kit, and was part of a series of kits of British ocean liners. The whole build was an exercise in nostalgia, as I attempted to imagine myself as a small boy who received a paper-wrapped kit in about 1966 and proceeded to glue it all together and paint it from little pots of British Humbrol paints. It all went together in a week and was very much the fun model build of a child. Smoke is cotton wool with Vallejo soot powder.
 |
| RMS Mauretania |
 |
| RMS Mauretania |
 |
| RMS Mauretania |

DUKW 353 (Italeri 1:72, with PE update set and 3-D printed stretchers)
The kit was actually completed a few years ago as a military vehicle but then I came a cross a rare photo of it being used in Normandy to transfer wounded from beach to ship. I made the white/red cross insignia panel and built the stretcher supports. This one is now part of my Ambulance collection.
Michael Roy
 |
| DUKW 353 |

LAUZ 967 Soviet Modern Light Amphibious Vehicle (ARMORY 1:72)
A 4 wheel drive "transporter" that can carry 400kg and go over various terrain. Produced 1961-75. Used by Soviet Army Airborne Troops (VDV) for casualty evacuation.
Michael Roy
 |
| LAUZ 967 |

50th ANNIVERSARY of CUP NOODLE (BanDai 1:1)
This is the very unusual 1:1 scale plastic model from BanDai of the (in)famous CUP NOODLE original release from Nissin of Japan in celebration of the 50th anniversary of the premiere of the product on 18 September 1971.
The model was released in celebration of the upcoming 50th anniversary of Cup Noodle. If you happen to be in Yokohama Japan feel free to visit the Cup Noodle Museum for the full unadulterated cup noodle experience, and to buy cup noodle merchandise if that is what you need. Instant ramen noodles were invented by Momofuku Ando in 1958, and the three-minute Cup Noodles premiered on 18 September 1971. Sales of Cup Noodles begin at Isetan Department Store in Tokyo's Shinjuku district.
The kit is without doubt some of the best engineering of plastic model parts I have ever seen. Several of the ring parts are moulded with the sprue on the inside of the ring so that removal does not leave any visible signs on the outside of the parts. Amazing! The whole thing is a snap-together model, and the tolerances and fit are superb. Who needs stinky glue?
The most amazing aspect of the kit is the plastic wrap stickers for the shrimp parts. The shrimp are moulded in an orange plastic which does not look much like cooked shrimp. The plastic sticker fits almost perfectly on a bumpy compound curved surface and instantly gives the proper colour for shrimp. It is hard to believe just how well thought out is this kit. The food parts are astoundingly life like, if you consider instant ramen to be food.
John Clearwater
 |
| Cup Noodle |
 |
| Cup Noodle |
 |
| Cup Noodle, both real and imagined, with the model looking far tastier than the real one. |
WORKS-IN-PROGRESS...
SA3 Конденсатор Kondensator (OKB Grigorov 1:72)
big ass gun!!
The 2A3 Kondensator 2P (2А3 Конденсатор - Capacitor) was a Soviet 406 mm self-propelled howitzer capable of firing nuclear projectiles. 2A3 is its GRAU designation. It was in service from 1956 until 1960.
This is a tracked gun, essentially a battleship gun on a tracked chassis! Only 4 were built - why - well, they were slow, couldn't go under most bridges, probably couldn't go over a lot more, no trucks or trains for transport and they found things broke when fired. After firing; the vehicle had to be checked and usually they found the idlers broken or the tranny messed up - they rolled back a piece when fired. So a 64 ton gun with a 16 miles range.
The kit is resin, etch and turned metal (barrel) with an amazing fit. Produced by OKB Grigorov it is being built for a BIG gun build on a discussion group.
The figure in the one pic is a 1:72 scale man about 1.75m tall. You can then see how small some of the etch pieces are! In the first picture the big chunk of resin is the breech!
Graham M.
 |
| 2А3 Конденсатор carrriage and breech. |
 |
| 2А3 Конденсатор ultra tiny PE part |
 |
| 2А3 Конденсатор carriage |
 |
| 2А3 Конденсатор in Moscow's Central Armed Forces Museum |
 |
| Leningrad's Artillery Museum display of very heavy artillery |
F-4 Phantom II (Tamiya 1:48)
I have never built an F-4 Phantom II model kit in my adult life; same with a Spitfire. (There, I admitted it... don't judge me! LOL) Even with all the offerings over the years from Revell/Monogram, Hasegawa,
Fujimi, Academy, and more recently Zoukei-Mura, I never got around to building an F-4. Then along comes Tamiya with their newest 1/48 F-4B offering, and the accolades keep pouring in left and right. I was curious to find out if this kit was as good as everyone is saying. It took only a few assembly steps to realized that the praise is well deserved. The engineering is ingenious, and the detail, fit, and finish are superb. I am now quite ruined for building F-4 kits from other manufacturers; Tamiya is now the 'gold standard.' I do not plan to use the kit decals, as I do not want to have the same model sitting on a contest table like so many others; on a recommendation from club member Peter Steacy, I went with decals from Bullseye Aviation Decals along with a different tail fin cap from Flying Leathernecks. I plan to build my F-4 with wings folded, flaperons sagged, speedbrakes extended, and canopies open. Other than a different fin cap and metal pitot tubes, this will be an out-of-box build. Highly recommended for
F-4 aficionados. Full build: https://photos.app.goo.gl/A7CFq1HnKsMjB8F16
Glenn Cauley
Fujimi, Academy, and more recently Zoukei-Mura, I never got around to building an F-4. Then along comes Tamiya with their newest 1/48 F-4B offering, and the accolades keep pouring in left and right. I was curious to find out if this kit was as good as everyone is saying. It took only a few assembly steps to realized that the praise is well deserved. The engineering is ingenious, and the detail, fit, and finish are superb. I am now quite ruined for building F-4 kits from other manufacturers; Tamiya is now the 'gold standard.' I do not plan to use the kit decals, as I do not want to have the same model sitting on a contest table like so many others; on a recommendation from club member Peter Steacy, I went with decals from Bullseye Aviation Decals along with a different tail fin cap from Flying Leathernecks. I plan to build my F-4 with wings folded, flaperons sagged, speedbrakes extended, and canopies open. Other than a different fin cap and metal pitot tubes, this will be an out-of-box build. Highly recommended for
F-4 aficionados. Full build: https://photos.app.goo.gl/A7CFq1HnKsMjB8F16
Glenn Cauley
 |
| F-4 Phantom II cockpit model, with decal on instrument panel |
 |
| F-4 Phantom II forward landing gear bay |

 |
| F-4 Phantom II blast end |
 |
| And this is where they end up... in a military museum in Viet Nam |


